Making a Split, Part 1
This is what I planned to do if my bees had actually prepared to swarm today.
If your bees have decided that the old home hive is getting too crowded, you might have to make a "split" from your original hive to keep your beloved working girls around. I thought that today was the day, because yesterday there appeared to be a capped queen cell in my colony of Italian bees. If the colony rears up a new queen, that means that the older bees are planning to take off with the old one to start a new hive somewhere.
For nature, this can look like a success story: "Where there was one pool of our genes, now there will be two!" But there are a few less attractive things to consider. For one thing, it's still too cold and there is not enough stuff blooming for a swarm to survive. Second, wild swarms almost never survive more than a few months around here because the Varroa mites (and other pest problems) are so bad. Only third comes the final worry: I'll lose more than half of the working bees from that colony.
What to watch for
The bees tell you what they need, if you only know what to look for. They probably won't swarm if there are no drones around: leaving a virgin queen behind with no potential mates defeats the purpose of splitting into two colonies. Second, they'll start building queen cells, and usually a number of them, in order to be sure that the colony they leave behind has that one crucial bee without which survival is impossible: the queen. Third, the workers will start eating up the honey stores like crazy, getting ready to take along the food they would need to get started elsewhere. (There are probably other signs, but I'm feeling like a pretty crummy beekeeper right now).
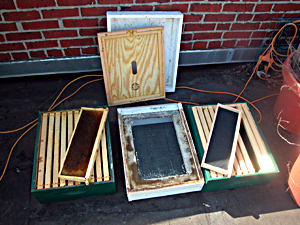
If you have a parent colony with queen cells and a lot of honey on hand, this is all you need to make a split. At left is a box of drawn honeycomb, which will provide a place for the old queen to start laying right away in her new home. In the middle is a screened bottom board and a hive stand to put the new hive boxes on (MaryEllen and her husband Doug made these – unlike me, they are GOOD beekeepers). On the right is a box of new foundation for those overfed swarm bees to work on. They are primed to draw comb after chowing down, so it's a great time to give them foundation and set them to work.
Now, if you are making a split from a colony that <em><strong>wasn't</strong></em> getting ready to swarm, you need a couple more things: a purchased queen for the parent colony (because they will not have made one for you), and a bunch of extra syrup for the new one (because the bees would not have been overeating in preparation for this change of address).
George Imirie gives better instructions (toward the bottom of the linked page) than I ever could for doing this sort of thing, but this is how I summarized what I planned to do:
- Set up a hive stand and set aside an inner cover and telescoping cover. Bring along a bunch of drawn comb, if you have any available.
- Locate the old queen and put the frame she is on in a empty separate hive body to isolate her (this is a good time to mark your queen).
- From the parent colony, remove about:
- 4 frames of brood, including 1 capped plus 3 with open (eggs & larvae) brood;
- all the bees clinging the brood frames; and
- 4 frames of honey
- For the "split" (new colony): Put 4 frames of plain foundation in a new box. Add 4 frames of drawn comb, 2 on either side, as well. Place a frame of honey on the both outer sides, for a total of ten frames (4 plain, 4 drawn, 2 honey. (This differs from what George said.)
- In another box, which will be the bottom of the split, place the frame with the old queen on it in the middle, then surround her with the three frames of brood (2 on one side, one on the other). Put 2 frames of drawn comb on either side, and a frame of honey on the outside, for a total of ten frames (4 brood, 4 drawn frames, 2 honey)
- Place the box with the old queen on the new hive stand.
- Shake a couple more frames worth of bees from the parent colony into the split: the nurses will stay, the workers will fly back to the parent.
- Put the top box (with plain foundation and drawn frames) on top.
- Place the inner and telescoping covers on.
- Place an entrance reducer.
- Leave them alone for a week, though watch for signs of trouble from outside.
- After a week, you may need to place empty supers on the new colony: a place for them to continue drawing comb and storing Spring nectar.
- Back to the parent colony: Your old parent colony now is short 8 frames plus the one the old queen was on. Place the frame with the new queen cell between frames 5 and 6 of the bottom box of the parent colony
- Surround the unborn queen (i.e. on the frames that used to be 5 and 6) with brood, newest closest, with capped larvae on outside, honey outside that.
- If you have another box of brood, place that on top. Fill any empty spaces with drawn comb, keeping honey frames on the outside. If you don't have enough drawn comb, group what drawn comb you have in center, honey around it, plain outside that.
- Reassemble colony. Place entrance reducer.
End result
You should end up with a somewhat smaller hive on the site of the parent colony, and that hive should include either a capped queen cell or a new queen that you purchased for the purpose of making a split.
In a different place (but it can be in the same apiary), you will have a two-box colony containing your old queen and her core rebuilding team.
Both colonies should be in a good position to build up again quickly.
<< Home